by Screens PeoPle
Share
by Screens PeoPle
Share

Replacing a laptop screen yourself can be easy or difficult depending on the exact model and your skill level. Many people with a cracked laptop screen consider doing the repair themselves. The success of this repair depends on the exact laptop model and user skill.
Good preparation before the job starts helps avoid many common problems later. Some laptop designs make screen replacement fairly easy with basic tools and patience. Other laptop designs have tight tolerances, adhesive bonds in the lid area, and intricate cable routing through the hinge area.
These complex features make the job harder and increase the risk of damage. Success requires research into the exact model before buying any new screen part, plus the purchase of a matching replacement panel. The work must follow a careful sequence during the disassembly and reassembly stages.
How Do You Determine Compatibility and Source the Right Screen?
The model number is the first thing to find for the replacement process. This number usually appears on a sticker on the bottom of the laptop. It can also be found in the system information through the operating system menus.
Once the model is known, the focus shifts to the screen specifications needed. These specifications include:
- The diagonal screen size and the native resolution of the panel.
- The connector type and the exact pin count on the cable.
- The backlight type and the mounting hole arrangement.
A screen that differs in any of these areas will not fit or work right. Replacement panels come from various suppliers, and buyers should check compatibility before purchase. This check helps avoid wasted time and extra expense on returns or wrong parts.
What Tools, Workspace, and Safety Precautions Do You Need?
The tools needed for the job are few, but they must be the right ones.
- A precision screwdriver set with Phillips bits handles most of the small screws.
- Plastic opening tools or spudgers help remove the bezel without scratches and prevent breaking small plastic clips.
- Tweezers make it easier to handle thin cables and small connectors during work.
- An anti-static wrist strap reduces the chance of static damage to electronics.
The workspace should have good lighting and a clean, flat surface for safety.
- The laptop must be powered off completely before any work begins.
- The power adapter must be unplugged from the wall and from the laptop.
- The battery should be removed if the design allows easy access from outside.
Laptops with internal batteries need the bottom cover opened to reach the cable. The battery cable must be disconnected first in those models before further steps.
How Do You Disassemble the Laptop Display Assembly?
Disassembly of the display follows a clear sequence of steps:
- Remove small covers on the bezel, which are often rubber or plastic plugs over the bezel screws. A plastic tool lifts the covers to expose the screws.
- Take out the screws and keep them in order for later use.
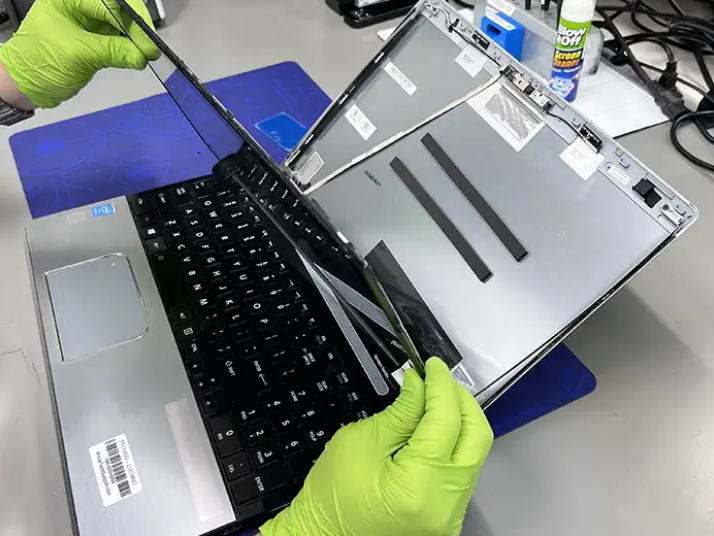
- Pry off the bezel gradually at the edges, starting at one corner and working around the frame to release all the clips. Rushing this step often breaks the plastic clips, so steady pressure with plastic tools is essential.
- Once the bezel is free, the old screen shows with screws on each side that attach it to the metal hinge brackets on the lid. Removing these screws lets the screen tilt forward from the top edge.
- Disconnect the video cable, a flat ribbon on the back of the old screen, by lifting a small latch or using a pull tab gently. This careful action prevents tearing the cable or bending any pins inside it.
- Disconnect any extra cables for the webcam and wireless parts before the screen comes out completely.
How Do You Install the New Screen and Reassemble the Device?
Reinstallation of the screen follows the reverse order of the disassembly steps.
- Position the new panel against the hinge brackets on the lid.
- Replace the side screws to hold the new screen firmly in place.
- Line up the video cable with the connector on the new screen and apply even pressure across the connector body to seat it fully without damage risk.
- Reconnect any other cables for extra components in their original positions.
- Run a power-on test before the bezel goes back on, to confirm the new screen shows the image without problems and that the panel and cable are installed correctly.
- Press the bezel back on until all clips engage with a click sound, then replace the perimeter screws and covers.
The full procedure takes between 40 minutes and 2 hours in most cases. The exact time varies with the model complexity and the user experience level.
What Risks Should You Consider, and What Are the Alternatives?
Several issues can happen during a self-replacement and raise the total cost.
- Plastic clips on the bezel break from too much force during prying work.
- Metal tools instead of plastic ones often cause scratches on the bezel surface.
- A broken clip leads to a loose-fitting front frame and may require extra repairs or a new bezel.
- The video cable can tear if pulled at an odd angle or too far.
- Static discharge during handling can damage the new screen or other parts inside.
- Debris that gets under the new screen causes spots or uneven backlighting.
Conclusion: Should You Replace Your Laptop Screen Yourself?
The decision to replace the laptop screen without professional help depends on key factors. A clear understanding of model requirements and access to the right parts is needed. A realistic appraisal of personal skill with small-scale mechanical tasks also matters.
When these elements align, the project delivers a functional display at a lower cost than typical shop rates in many instances. When uncertainty exists about any phase of the work, a technician can assist. Consulting a professional prevents complications that could cost more than the original savings amount.
This step is wise when the laptop has significant value and complex construction details. For quality laptop LCD screens compatible with many models, visit Screens People online today.
STAY IN THE LOOP
Subscribe to our free newsletter.
Leave A Comment

Vertical or horizontal lines on a laptop screen happen when [...]

A 4K screen can be worth it on some 13-inch [...]
You find the exact replacement part number for your screen [...]
You can enable Night Light or blue light filters in [...]